|
8086 Assembler Tutorial for Beginners (Part
11)
Making your own Operating System |
הדרכה בתכנות אסמבלר 8086 למתחילים (חלק
11)
כתיבת מערכת הפעלה אישית |
|
Usually, when a computer starts it will try to load the first 512-byte sector
(that's Cylinder 0, Head 0, Sector 1) from any diskette
in your A: drive to memory location 0000h:7C00h and give it control.
If this fails, the BIOS tries to use the MBR of the first hard drive instead. This tutorial covers booting up from a floppy drive, the same principles are used to boot from a hard drive. But using a floppy drive has several advantages:
|
בדרך כלל, כאשר מופעל מחשב, הוא ינסה
להטעין את 512 הבתים הראשונים של כל דיסקט הנמצא בכונן :A
לחיפוש מערכת ההפעלה (מסלול "0" החיצוני של הדיסקט, ראש "0",
במקטע 1), ואותם נתונים מעתיק לזיכרון ה-RAM
שבכתובת 0000h:7C00h
ומעביר את בקרת המחשב לאותו מקום. אם זה
נכשל, אז תוכנית BIOS
מנסה להפעיל מערכת הפעלה דרך טבלת MBR
של דיסק הקשיח.
דוגמה של מערכת הפעלה פשוטה לאתחול מתוך דיסקט: |
|
|
|
Copy the above example to Emu8086 source editor and press You can run it just like a regular program, or you can use the Virtual Drive menu to Write 512 bytes at 7C00h to the Boot Sector of a virtual floppy drive (FLOPPY_0 file in Emulator's folder). After writing your program to the Virtual Floppy Drive, you can select Boot from Floppy from Virtual Drive menu. |
העתק את הדוגמה הקודמת לעורך קובץ מקור ולחץ בכפתור: [הידור
ואמולציה]. |
|
If you are curious, you may write the virtual floppy (FLOPPY_0) or
".boot" file to a real floppy disk and boot your computer from it,
I recommend using "RawWrite for Windows" from:
http://uranus.it.swin.edu.au/~jn/linux/rawwrite.htm (recent builds now work under all versions of Windows!) Note: however, that this .boot file is not an MS-DOS compatible boot sector (it will not allow you to read or write data on this diskette until you format it again), so don't bother writing only this sector to a diskette with data on it. As a matter of fact, if you use any 'raw-write' programs, such at the one listed above, they will erase all of the data anyway. So make sure the diskette you use doesn't contain any important data. |
מתוך סקרנות, אתה יכול לכתוב את הדיסקט המדומה (FLOPPY_0)
או את הקובץ "boot."
לדיסקט ממשי ולאתחל דרכו את המחשב שלך, מומלץ להשתמש
"RawWrite for Windows"
מכתובת אינטרנט: |
|
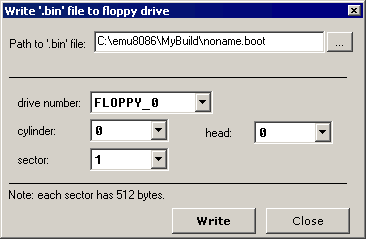
".boot" files are limited to 512 bytes (sector size). If your new Operating System is going to grow over this size, you will need to use a boot program to load data from other sectors. A good example of a tiny Operating System can be found in "Samples" folder as: micro-os_loader.asm micro-os_kernel.asm To create extensions for your Operating System (over 512 bytes), you can use ".bin" files (select "BIN Template" from "File" -> "New" menu). To write ".bin" file to virtual floppy, select "Write .bin file to floppy..." from "Virtual Drive" menu of emulator: |
|

| You can also use this to write ".boot" files. | אתה יכול להשתמש לכתיבת קבצי ".boot". |
Sector at:
-מקטע ב
is the boot sector! |
| Idealized floppy drive and diskette structure: |
עיקרון כונן דיקטים ומבנה של דיסקט מקרא של התמונה: Cylinder = מסלול Sector = מקטע Head = ראש כתיבה/קריאה Floppy Disk = דיסקט גמיש |

|
For a 1440 kb diskette:
To read sectors from floppy drive use |
עבור דיסקט של 1440 קילו-בית (1440KB)
לקריאת מקטעים של הדיסקט משתמשים ב-: |
Copyright 2002-2003 - Emu8086, Inc. All rights reserved. - Portions Copyright 1997-2003 Barry Allyn. All rights reserved.
Hebrew Version Copyright COVAL Computer Software - Copyright © 2003 R&D Private Advisers All rights reserved.