| I/O ports | שערי קלט/פלט |
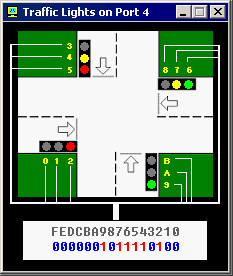
| Emulator does not reproduce any original I/O ports of IBM PC, instead it has virtual devices that can be accessed by IN/OUT instructions. | האמולטור לא משתמש בכתובות ממשיות של המחשב. במקום זה לאמולטור התקנים מדומים (וירטואליים) הניתנים להפעלה דרך פקודות קלט פלט. |
|
Custom I/O Devices
"Emu8086" supports additional devices that can be created by 3rd party vendors. Device can be written in any language, such as: Visual Basic, VC++, Delphi. For more information and sample source code look inside DEVICES folder. Reserved input / output addresses for custom devices are: from 00000Fh to 0FFFFh (15 to 65535). Port 100 corresponds to byte 100 in "EmuPort.io" file, port 101 to the byte 101, etc... (we count from zero). "EmuPort.io" file is located in Windows "Temp" directory (can be accessed by GetTempPath() function of the API). I'll be glad to include devices made by you in the next release of "Emu8086". If you decide to share your device with other developers around the world - please send us the source code of the device! |
התקני קלט/פלט סטנדרטים |
Devices
are available from "Virtual Devices" menu of the emulator.
|
ההתקנים ניתנים להפעלה מתוך התפריט של האמולטור ב- "מתקנים מדומים"
|
|
For example - למשל
MOV AX, 0000001011110100b |

| We use yellow hexadecimal digits in caption (to achieve compact view), here's a conversion: | אנחנו משתמשים בספרות על פי שיטה בסיס 16 לצורך ההפעלות. בהמשך טבלת המרה: |
|
Hex - Decimal |
|
First operand for OUT instruction is a port number (4), second operand
is a word (AX) that is written to the port. First operand must be an immediate byte
value (0..255) or DX register. Second operand must be AX or AL only.
See also "traffic_lights.asm" in Samples. If required you can read the data from port using IN instruction, for example: |
האופרנד הראשון של פקודת
OUT הוא שער מספר (4),
האופרנד השני זו מילה (AX)
שתוכנה נרשמת בשער. האופרנד הראשון חייב להיות מספר על פי מיעון מיידי
(0...255) או תוכן של אוגר DX.
האופרנד השני חייב להיות רק AX
או AL בלבד. ניתן לקרוא תוכן של שער (נתון) אם משתמשים
בפקודת IN,
לדוגמה: |
|
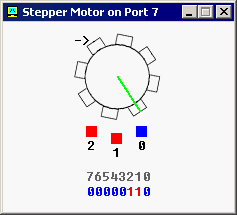
Stepper Motor - Port 7 (byte) The Stepper Motor is controlled by sending data to I/O Port 7. Stepper Motor is electric motor that can be precisely controlled by signals from a computer. The motor turns through a precise angle each time it receives a signal. By varying the rate at which signal pulses are produced, the motor can be run at different speeds or turned through an exact angle and then stopped. This is a basic 3-phase stepper motor, it has 3 magnets controlled by bits 0, 1 and 2. Other bits (3..7) are unused. When magnet is working it becomes red. The arrow in the left upper corner shows the direction of the last motor move. Green line is here just to see that it is really rotating. |
מנוע צעד - שער 7 (בגודל מילה) שליטת המנוע צעד מתבצעת על ידי משלוח נתונים שכתובת קלט/פלט מס' 7. מנוע צעד הוא מנוע חשמלי הניתנת לשליטה במדויק על ידי אותות מתוך מחשב. המנוע מסתובב בזוית מדויקת כל פעם שמקבל אות מהמחשב. על ידי שינוי של קצב העברת האותות, המנוע יכול לנוע במהירויות שונות או להסתובב בזוית מדויקת ואז נעצר. זה מנוע צעד בסיסי של 3 פאזות, למנוע 3 מגנטים הנשלטים דרך סיביות 0, 1 ו- 2. יתר הסיביות הם לא בשימוש. כאשר המגנט פועל בהדמיה הוא הופך לאדום. החץ בפינה העליונה והשמאלית מראה את הכיוון של התנועה האחרונה של המנוע. הקו הירוק פשוט מסמן שהמנוע באמת מסתובב. |

| For example, the code below will do three clock-wise half-steps: | למשל, התוכנית שבהמשך יגרום למנוע לבצע שלוש חצי-צעדים בכיוון השעון: |
|
MOV AL, 001b ; initialize - אתחול |
|
If you ever played with magnets you will understand how it works.
Try experimenting, or see "stepper_motor.asm" in Samples.
If required you can read the data from port using IN instruction, for example: IN AL, 7 Robot - Port 9 (3 bytes) |
אם אי פעם שיחקת עם מגנטים אתה תבין איך זה
פועל. נסה לבצע ניסוים בעצמך או ראה תוכן הקובץ:
"stepper_motor.asm" שנמצא בתיקיית
SAMPLES של התוכנה. רובוט - שער 9 (בגודל 3 מילים) |

|
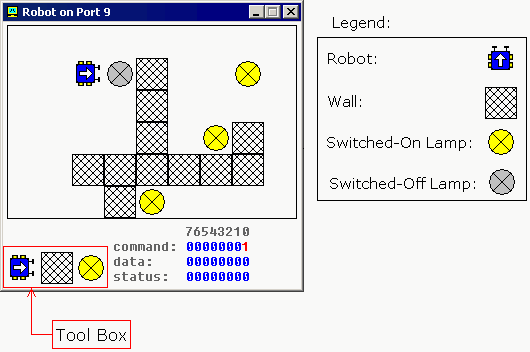
The Robot is controlled by sending data to I/O Port 9. First byte (Port 9) is a Command Register. Set values to this port to make robot do something. Supported values: |
שליטת הרובוט מתבצעת על ידי משלוח נתונים שכתובת קלט/פלט
מס' 9. הבית הראשון (שער 9) זו פקודה לאוגר הבקרה של הרובוט. קביעת ערכים לשער זה גורמים לרובוט לבצע משהו. הערכים הנתמכים הם: |
|
Decimal Value ערך עשרוני |
Binary Value |
Action - פעולה |
| 0 | 00000000 | Do nothing - על תעשה שום דבר | 1 | 00000001 | Move Forward - הזז קדימה |
| 2 | 00000010 | Turn Left - סובב שמאלה |
| 3 | 00000011 | Turn Right - סובב ימינה |
| 4 | 00000100 |
Examine. Examines an object in front using sensor. When robot completes the task, result is set to Data Register and Bit #0 of Status Register is set to 1. בחון. בחון חפץ בחזית תוך שימוש בחישן. כאשר הרובוט מסיים את המשימה, התוצאה נשמרת באוגר נתונים והסיבית מספר אפס של אוגר המצב הוגדר כאחת. |
| 5 | 00000101 | Switch On a Lamp - הדלק מנורה |
| 6 | 00000110 | Switch Off a Lamp - כבה מנורה |
| Second byte (Port 10) is a Data Register. This register is set after robot completes the Examine command: | הבית השני (שער 10) זו פקודה לאוגר הנתונים של הרובוט. קביעת ערכים לשער זה מתבצע לאחר שהרובוט מסיים את פקודת ההבחון: |
|
Decimal Value |
Binary Value |
Meaning משמעות |
| 255 | 11111111 |
Wall - קיר |
| 0 | 00000000 |
Nothing - כלום |
| 7 | 00000111 | Switched-On Lamp מנורה דולקת |
| 8 | 00001000 | Switched-Off Lamp מנורה כבויה |
| Third byte (Port 11) is a Status Register. Read values from this port to determine the state of the robot. Each bit has a specific property: | הבית השלישי (שער 11) זו מאוגר המצב של הרובוט. יש לקרוא ערכים משער זה לצורך קביעת מצב הרובוט. כל סיבית מצביע על תכונה ספציפית: |
|
|
Description |
תאור |
| Bit #0 | zero when there is no new data in Data Register, one when there is new data in Data Register. | אפס כאשר אין נתונים חדשים באוגר הנתונים, אחד כאשר יש נתונים חדשים באוגר הנתונים. |
| Bit #1 | zero when robot is ready for next command, one when robot is busy doing some task. | אפס כאשר הרובוט מוכן לפקודה הבאה, אחד כאשר הרובוט עסוק ועושה משימה כל שהיא. |
| Bit #2 | zero
when there is no error on last command execution.
one when there is an error on command execution (when robot cannot complete the task: move, turn, examine, switch on/off lamp). |
אפס כאשר אין טעות בביצוע
של הפקודה האחרונה. |
|
Example - דוגמהMOV AL, 1 ; move forward - הזז קדימה OUT 9, AL ; MOV AL, 3 ; turn right - סובב ימינה OUT 9, AL ; MOV AL, 1 ; move forward - הזז קדימה OUT 9, AL ; MOV AL, 2 ; turn left - סובב שמאל OUT 9, AL ; MOV AL, 1 ; move forward - הזז קדימה OUT 9, AL ; |
|
Keep in mind that robot is a mechanical creature and it takes some time for it to complete a task. You should always check bit#1 of Status Register before sending data to Port 9, otherwise the robot will reject your command and "BUSY!" will be shown. See "robot.asm" in Samples. |
זכור שהרובוט הוא יצור מכני וזה לוקח לו כמה זמן לסיים
משימה. אליך לבדוק תמיד את ערך הסיבית אחד (bit#1)
של אוגר המצב לפני כל משלוח נתון לשער 9, אחרת הרובוט ידחה את
הפקודה שלך ויופיע את ההודעה
"BUSY!" . נסה לבצע ניסוים בעצמך או ראה תוכן הקובץ: "robot.asm" שנמצא בתיקיית SAMPLES של התוכנה. |
|
Creating Custom Robot World Map
|
יצירת מפה עבור הפעלת
הרובוט |
Copyright 2002-2003 - Emu8086, Inc. All rights reserved. - Portions Copyright 1997-2003 Barry Allyn. All rights reserved.
Hebrew Version Copyright COVAL Computer Software - Copyright © 2003 R&D Private Advisers All rights reserved.